
Nexus has many pathways to collect your data. The advantage of this is that you can configure it to do exactly what you need for your research project. If you’re new to using Vicon motion capture it can be confusing how to put together a basic data collection pipeline. This guide will cover some simple steps you can follow to collect data with Vicon Nexus.
Prior to collecting data you should have already:
- Positioned your cameras in suitable locations around the capture volume
- Optimised the Aperture on the cameras
- Adjusted the Threshold for each camera in Nexus
- Added and configured any other devices such as force platforms
- Decided on a relevant marker set for your project
This guide assumes you have done the Vicon camera optimisation prior to your data collection.
TIP: Logemas can assist with hardware optimisation if it has been a while since your installation or you’ve moved to a new space. However, it is a charged service for an engineer to travel onsite for system optimisations or do virtual training sessions. If your lab has a support contract with us, a system optimisation is performed annually. Contact us at hello@logemas.com if you’d like more information on support contracts.
The Basic steps in data collection are:
System configuration
The first step is to check your cameras and devices are connected to the system. When the PoE switch is powered the cameras should power up and connect to Nexus. The green play symbol means the camera or device is contributing data.
If the cameras don’t connect to Nexus you should try some of these steps.
- Check the indicator lights on the cameras
- Blue is connected
- Purple is selected
- Red is disconnected
- Check the system is in Live mode and not offline
- Check that the camera is enabled ☑️ in the Properties section at the bottom of the System tab
- Check that Windows Firewall is allowing Vicon software. Watch our video here.
- Check the network switch is connected to a configured ethernet port on the PC network card. See our guide here.
The other thing to check is whether your cameras and devices appear in the system. For the purpose of this guide, we will assume any force platforms or EMG systems have previously been added and configured in the current system profile. When the cameras and devices are connected to the system they should appear at the bottom of the list.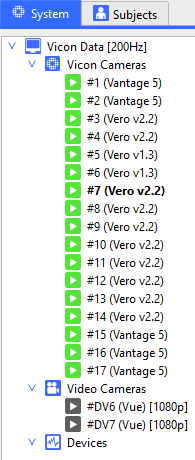
Troubleshooting tip: If your sample rates look confusing, remember that to maintain compatibility with different file types there needs to be a common factor between all the device sample rates. The sample rates of each device are not independent of each other.
Data Management
Once you have your system set up you also need to make a data management structure to save your files in a logical format. Vicon software uses the Eclipse database system to maintain your data structure.
Creating and managing your database
Important buttons to know for Data Management
Like most of Nexus, you generally work from left to right and top to bottom. The buttons you need to be aware of are:
 Show the main ProEclipse menu. This is where you create and manage databases.
 Create a new patient classification. Use this to create a new project, such as a different movement pattern or task.
 Create a new patient. For each participant in your research, you would have a separate patient node.
 Create a new session. You might have multiple testing sessions with the same participant over time. This will create a node to store the trial data. As you create a subject and collect trials the session folder will populate with different types of files. These correspond to the different types of data files that are saved for the trial.
Typical Database Structure
A Typical Database might look something like the image below, where you can see the hierarchy of Database node > Classification node > Patient node > Session node.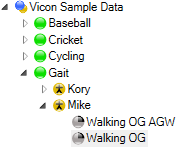
You can think of the different levels as
- Database
- Project (experiment)
- Participant
- Session (each participant can have more than one)
Types of files found in Data Management
| Icon | Data type | Description |
| Movie File | Multimedia sound and moving picture data in .mp4, .mpg or .avi format files | |
| Raw Analog Data | Unprocessed analog data (e.g., from force plates) in .x1d format files | |
| Model Parameter File | The model’s parameters for the subject’s skeleton | |
| Centroid/Grayscale File | Unprocessed Vicon video data from Vicon cameras in .x2d format files | |
| Processed Capture Data | Processed Vicon 3D motion data in .c3d format files |
Calibration
Before every data collection you’ll need to calibrate the system to make sure your marker tracking is accurate. To do this you’ll use the System Preparation tab in the Tools pane on the right side of the screen.
Vicon has a video guide on their Youtube channel
For optical cameras the process is simple. Work down the list on the calibration panel (aside from the video buttons) in order to calibrate the system.
- Remove any markers from the volume, especially those that are in the capture space or if you are using markers in a custom frame for your origin.
- Use the Mask Cameras start button to automatically begin looking for reflections to block from the sensor. This will block ANY reflections so be sure the masks are not covering important parts of your capture volume. The Blue blobs will appear on the camera views as the masks are added to each camera.
- Get your calibration wand ready and use the Calibrate Cameras start button to initialise the camera calibration. There are some important things to keep in mind:
- Two cameras must see the wand for it to contribute to calibration
- Try to cover a large area of the capture volume and move around so each camera has an equal number of points it can see the wand. Move yourself around the space to make sure your body isn’t blocking certain cameras. Hold the wand in different positions to make sure different sets of cameras can see the wand throughout the calibration.
- Use the Strobe setting on the wand for indoor captures in typical lighting. The wand LEDs will strobe at the camera frequency. Use the Continuous setting for outdoor captures in bright conditions or cameras without LEDs such as the Viper.
- When complete the system will start calibrating pairs of cameras and reporting the error values in the bottom right corner. An image error of 0.3 is a good target.
- Place the wand at your desired origin location. Typically you would use the guides on the wand to align it with a force platform or walkway for example. Use the Set Volume Origin to reset the volume origin to the current location of the wand. If the wand isn’t perfectly flat, don’t worry, the next step will help.
- You can use the Set Floor Plane advanced setting to adjust the coordinate system to the plane of the floor or treadmill. Place 4 markers on the floor around the capture area. Check the size of the marker used. Manually select the markers in the 3D perspective or if they’re the only markers in the space you can use the Autodetect button. You should see the floor grid adjust to the new position based on the offset you enter (e.g. for a 14 mm marker on 2 mm base it would be -9 mm z-offset).
- The final step is to renumber the cameras. Use the Auto number cameras button to renumber the cameras in sequence around the room. If you prefer a specific order to the camera numbers you can manually change them by right-clicking Vicon Cameras in the System panel.
If the system calibration fails or does not look correct follow these steps:
- Check the masks are not blocking central parts of the sensor
- Check you have selected the correct wand or calibration frame from the drop-down list
- Check that the floor plane markers are selected in the relevant step
Create a Subject
To capture data and label automatically, Vicon uses a labelling template (VST) and a subject-specific skeleton (VSK). This contains the marker list for your subject, which when calibrated for the subject skeleton, can automatically label the markers in a trial based on their relative positions.
TIP: If you’re coming from a Qualisys background, the VST is like your label list. When combined with the calibrated labelling skeleton (VSK) you achieve similar to the Qualisys AIM model: a scaled labelling skeleton for your subject.
It will be easier at first to use a standard preloaded template like plug-in-gait (PIG) or clinical gait model (CGM). If you want to create your own VST you can achieve this in two ways:
- Create a new VST from static capture and save it as a new template
- Add your custom markers to an existing template with a similar marker set
In this guide we’ll assume you have your marker set and VST ready. At this point, you’ll need markers on your participant so you can capture trials with the markers in the volume.
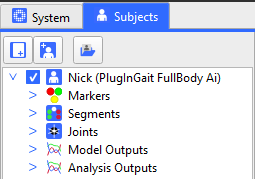
To create a subject we switch from the System pane to the Subjects pane. You’ll have 3 options for creating a subject within the current session.
- Create a blank subject: this would be the option to choose when creating your own VST for the first time.
- Create a new subject from an existing template: Once you have your own VST you can use this option to load the relevant information about the markers and segments, or use this option to creat a subject based on one of the preloaded VSTs.
- Load an existing subject: You can select this option if you have previously captured data with the same subject and template. However, you should still calibrate the skeleton (later step) during the new session as it is possible to have small variations in marker placement even though it is the same person.
Capture a static calibration trial
To label your data automatically during dynamic trials, you will need to have a static trial labelled. This step is also important for modelling processes that use the marker locations to calculate various parameters based on the skeletal geometry of the participant.
- Place your marker set on the participant using DS tape, co-band and sports tape
- Position them in a standardised pose in the centre of your capture volume. Specific poses (A-pose, T-pose, motorbike etc.) may be required depending on your marker set and modelling approach.
- Capture a short trial (2-3 seconds) with the participant holding that pose
- Reconstruct the trial and check ALL the markers are visible. Missing markers in the static trial can cause big problems so it’s worth solving any missing markers and collecting another static to make sure every marker is present in the static trial.
- Either manually label the static trial or use the Auto Initialize labelling pipeline to label and calibrate your skeleton.
Set Up Labelling
Auto Initialize labelling
The simplest way to get automatic labelling (and a good place to start if you are learning to use Nexus) is to use an existing template for your subject (e.g. PIG or CGM2) so that the labelling step can more easily identify the markers and label them correctly.
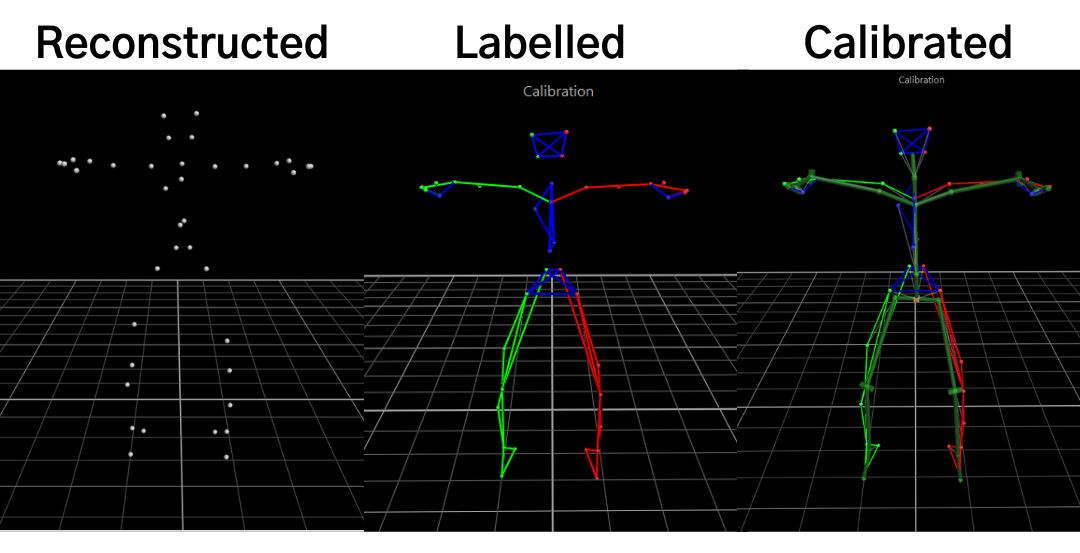
There are 3 steps to the Auto Initialize labelling pipeline command:
- Autolabel Static Frame: automatically labels the trajectories in a single frame. If it looks incorrect, undo any labelling and manually label the trial. This pipeline command can perform poorly if your subject is a different size to the default template or the marker placement differs significantly. If you manually labelled the static trial, skip this step and go to step 2.
- Scale subject VSK: Scales the labelling skeleton based on the marker positions.
- Marker-only Subject Calibration: Calibrate the subject’s marker locations based on the scaled skeleton.
Vicon has a video guide on their Youtube channel
Do I need to do a functional calibration?
There isn’t a single rule about whether you should or shouldn’t do a functional calibration trial. For highly dynamic movements it can help the auto-labelling process to have the joints move through their full range of motion. However, for many gait applications, static calibration will do a good job if the cameras are well-positioned, optimised and calibrated. It’s best to try this out during your pilot testing phase to see if it does affect your processing pipeline.
Capture dynamic trials
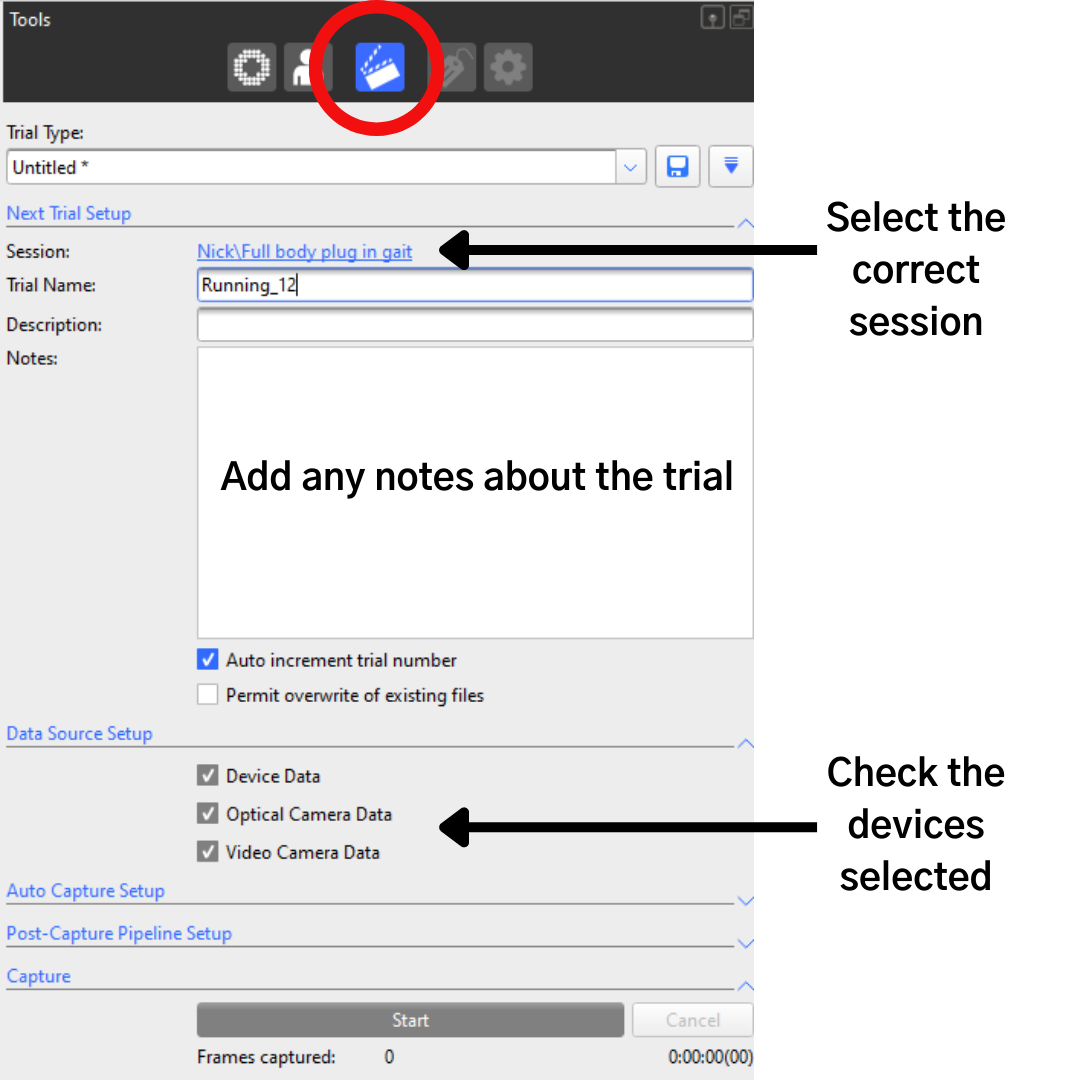
The simplest way to capture your trials is to manually start and stop the trial from the Capture pane. There are some important features to be aware of:
- Trial types store the capture settings so you can simply select the trial you are about to capture: static, dynamic, jump, hop, run etc.
- Make sure you are capturing to the appropriate session folder. The files for the trial will automatically save to the indicated folder.
- Trial Name is typically something that can be easily identified in post-processing. It’s a good idea to come up with a system of text or number identifiers if you will need to index certain trials during your analysis.
- Data Source Setup is important to check you are capturing the types of data that you want. For example, if you have video cameras in your system but the Video Camera Data option is unselected, you will see the video feed in the live view but won’t get video files captured.
Dynamic Trial Labelling
When the labelling skeleton has been scaled and calibrated you will see the labelling work while the system is in Live mode. To see if your labelling was successful for your captured data collection you can use the Reconstruct and Label pipeline. Some gaps may need to be filled if there are areas of the capture where markers are obscured by other parts of the boy or objects. In this case you can start with the Auto Intelligent Gap Fill pipeline, which includes the KinFit command.

Summary
This guide will get you started with collecting data in Nexus. There are many ways to adapt this process to your project as you develop skills in Nexus. The pattern of data collection remains the same though:
- Connect the system
- Set up your data management system
- Calibrate the cameras
- Create your subject
- Collect a static trial
- Label and Calibrate the skeleton
- Collect the dynamic trials
- Perform any gap filling
For more information about how to use features of Vicon Nexus you can find our Quick Bite and Instructable videos on our Youtube channel.