
There are several steps to set up your capture PC for first-time use with Vicon systems:
The most common support questions we see are related to the network card and firewall settings. If you’re having trouble connecting your system please check out our Common Nexus Issues page for guides on how to fix these problems. We can often help fix the graphics or network card settings remotely if you have TeamViewer installed on your PC. Firewall settings need to be fixed on-site by your IT support team as in most cases we don’t have permission to change firewall settings.
1. Graphics card
Compatible Models
Vicon systems are tested for use with NVIDIA graphics cards such as the NVIDIA® GeForce RTX™ 3060. Vicon software uses the Intel MKL library for its operations, which is why NVIDIA GPUs are recommended. The required specifications vary depending on the number of cameras in the system and the software being used. You can find the latest Vicon PC specifications here.
Integrated vs Dedicated Graphics
Some processors will have integrated graphics capabilities, meaning that the GPU is built into the processor. This is different to dedicated graphics, which is a separate GPU with its own memory that is not shared with the CPU. Intel processors without any letters after the model number (e.g. i5-9400) will have integrated graphics, which most of the time is fine for running the display. However, Vicon software will need a dedicated graphics card to operate effectively on your capture PC.
Configure Windows to use Dedicated Graphics
Having a dedicated NVIDIA graphics card is the major step in the process. From here you’ll need to make sure Windows is using the graphics card for Vicon software.
Check your graphics card is installed and detected
- Open the Device Manager from the Start Menu
- In the list, there should be a Display Adapters option
- Expand that list and check that your graphics card is listed. You may have a second entry, which is the integrated graphics e.g. Intel UHD Graphics
- If your graphics card does not appear here, or appears incorrectly, you most likely need to get the latest drivers for your graphics card. You can download these from the relevant manufacturer support page (e.g. nvidia)
- When installed, the drivers should allow the system to use the dedicated graphics card. The dedicated graphics card must be used with Vicon software as the GPU has greater processing power than the CPU integrated graphics.
Signs your PC is trying to use integrated graphics:
- Vicon Nexus/Tracker/Shogun will crash when trying to go live
- Screen glitches or stuttering
- User interface doesn’t appear or respond as expected
Steps to configure Windows to use a dedicated graphics card:
- Open the System Settings and navigate to Graphics Settings
- In Custom options for apps, select Browse and navigate to the Vicon install directory e.g. C:\Program Files (x86)\Vicon\Nexus2.12\Nexus.exe
- Add the Vicon application (e.g. Nexus) and it should appear in the list
- In the Graphics Settings, find your Vicon software and select Options
- In the preferences window, select the High Performance option e.g. GPU: NVIDIA GeForce RTX 3060
2. Network Card
Vicon System Configuration
Vicon systems use a Power over Ethernet (PoE) network switch to allow the PC to communicate with the cameras. Below is an example of a 24 camera Vantage system, which uses two switches as each switch can only provide power for up to 12 Vantage cameras. The optical data is connected to the PC network card via an Ethernet cable.
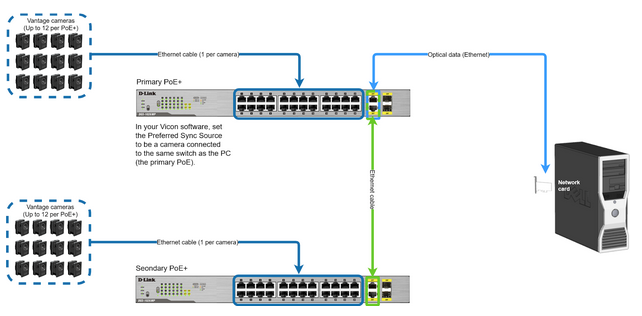 This requires a network interface card (NIC) to connect the switches to the PC. This is not the same ethernet connection as the standard wired internet connection port in your PC or laptop. Vicon supplied machines for example include an Intel 10G Dual Port X550-T Adapter (2X10 GbE) NIC PCIe Card.
Troubleshooting tip: Check your switch is connected to the network card and not the motherboard ethernet port
 Configure the Network adapter
When the network card is installed on the PC it should display as an available network adapter for the PC. Depending on your PC configuration you may have several different network adapters available. For example, you might have other Wifi and Ethernet adapters connected to the system like the image below:
 To find your network adapters, go to Start > Device Manager > Network adapters. If your network adapter does not display in the list, it’s possible that:
- The network card is not installed correctly in the PCle slot. Once a cable is connected to the port the lights on the connector should flash if the card is powered.
- The PC does not have the drivers installed your network adapter.
For example, you might have an Intel X550-T2 Adapter physically installed on the PC but do not see it available in Device Manager. You can download the complete Intel driver pack from their support pages here. When the drivers are installed you should have the network card adapter listed in the device manager window like this:
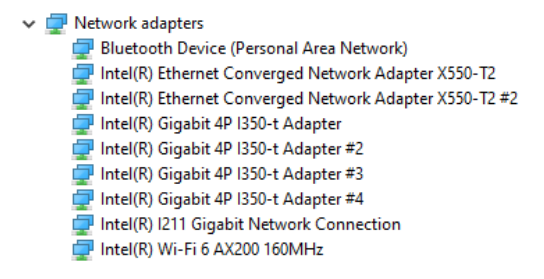 In the example above there are two network cards installed on the PC: the X550-T2, and the I350-T4. Each port can be individually configured for use with the Vicon system. Depending on your system configuration, you may need to configure multiple ethernet ports. They will need the same advanced settings, but will each need a unique IP address (covered below).
Network Card Settings
With the network card and drivers installed, it needs to be configured for the type of Vicon system you are trying to connect. The Vicon cameras use specific IP addresses for each connection to the PC. Depending on the use of each port, the exact settings differ slightly. For example, an 8 camera Vantage system needs 1 port configured for that connection between the switch and network card. If there are additional Vue video cameras as part of the system configuration, that requires a different port to be configured for the video cameras. We have compiled a complete guide to PoE network settings on our support page.
Troubleshooting tip: If your software opens but you can’t get marker data to show correctly, it could be that the advanced settings have not been configured and the amount of data getting through is restricted. The most likely problem is that the amount of data getting through is limited, which settings like “Jumbo packets” affect.
There are also some advanced settings that need to be configured to allow large amounts of data through to the Vicon software. The full instructions can be found here.
The advanced options that need to be configured are:
| Setting | Value |
| Interrupt Moderation | Disabled |
| Interrupt Moderation Rate | Off |
| Jumbo Packets | 9014 (Maximum) |
| Maximum number of RSS queues | 16 (Maximum) |
| Receive Buffers | 4096 (Maximum) |
| Received Side Scaling | Enabled |
| Transmit Buffers | 16384 (Maximum) |
This list is typical for an X550 card. The available options for your individual card values might differ. Change as much as is available from the list above.
3. Vicon software
Download the software
Once your PC is set up and your system is connected, you are ready to get the Vicon software fired up! You can download the Vicon software you purchased with the system from the Vicon website.
 Plan your license allocation
Vicon software is licensed by the number of seats purchased for that type of software e.g. 10 seats of Vicon Nexus. To allow customers to have flexible use of the software these can be allocated to three different types of licenses:
- Standalone: a single license seat locked to a single PC. The license request generates a locking code that links the license to the specific PC. This is most commonly used on your capture PC.
- Network: a pool of multiple licenses on a (virtual) server. A single license seat can be used while connected to the server. When the software is not in use the license seat becomes available to the pool again. This is most commonly used for additional license seats that are purchased for analysis PCs or laptops. If you are onsite but planning to work offsite for a time you can check out a license.
- Dongle: a single license locked to a USB dongle. Standalone and Network licenses are most common, while Dongle licenses are specific for systems that may not be able to have the PC connected to a network for example. Where possible it is advised not to use Dongle licenses as it is more likely to be lost/misplaced.
IMPORTANT: If you are moving to a new PC or changing the distribution of available licenses you need to revoke the existing licenses prior to requesting licenses for the new hardware. Changing core PC components like the motherboard can also change the locking codes and prevent your license from working.
Request and Activate a license
When you install your vicon software it will include the Vicon Product Licensing application. This application will manage your licenses and can generate the files needed to activate or revoke your licenses if necessary. To request a Vicon software license follow these steps.
After you request a license:
- Logemas will check the license file details and confirm the license request with Vicon HQ
- Vicon HQ will generate a license file based on the PC or server information included in the request.
- The license file will be returned to you for activation. This process usually takes 24-48 hours to return the license files. For multiple licenses (e.g. a standalone and a 5-seat network) you will receive multiple license files to match each request.
- You can activate your new license by following these steps
4. Windows Firewall
Since the Vicon cameras are sending data through ethernet connections, the Windows firewall can sometimes block data from getting through to the software. What you need to do is allow the Vicon software (Nexus, Shogun, Tracker, Licensing) permission to communicate through the firewall.
To allow an application through the firewall:
- Open the ‘Allow an App through Windows Firewall’ menu
- You may need to select ‘Change settings’ to make changes
- Scroll down to the Vicon software
- Tick the boxes next to each of the Vicon software you have installed
- If you can’t see your Vicon software in the list select the ‘Allow another app…’ button near the bottom-right of the window.
Troubleshooting tip: If you cannot see your cameras and devices in your Vicon software, it’s likely that your software doesn’t have Public network access through windows firewall. It’s preferable to allow the Vicon software on all networks. If your IT policy does not allow this, it may be possible to change the network profile type for your Vicon software to only Private. Contact your IT support team to assist.