Vicon has partnered with Theia Markerless to provide integrated, synchronised video and marker data collection. What does this mean? It means that with the single click of a mouse you can be recording gold-standard marker data and enough video streams to perform markerless data modelling:
- Synchronously (no sync signals or flashing LEDs!)
- In the same lab coordinate system (no translational/rotational data alignment!)
- With the same calibration information (no checkerboard!)
These advanced features facilitate validation projects comparing the two measurement systems, but also opens up the power of Nexus to markerless data collection – add force plate, EMG, IMU or any compatible device data to your markerless dataset, trigger start/stop data capture, manage databases easily using Eclipse Data Management, and much more.
In this blog, Denny takes you through processing your markerless video data in Nexus via Theia markerless to output kinematics – and now kinetics!
Thanks to Prof. Roy Cheung at Western Sydney U. for providing the data! Check out Prof. Roy’s research profile over at www.westernsydney.edu.au
But Why Would I Use Nexus for My Video Capture?
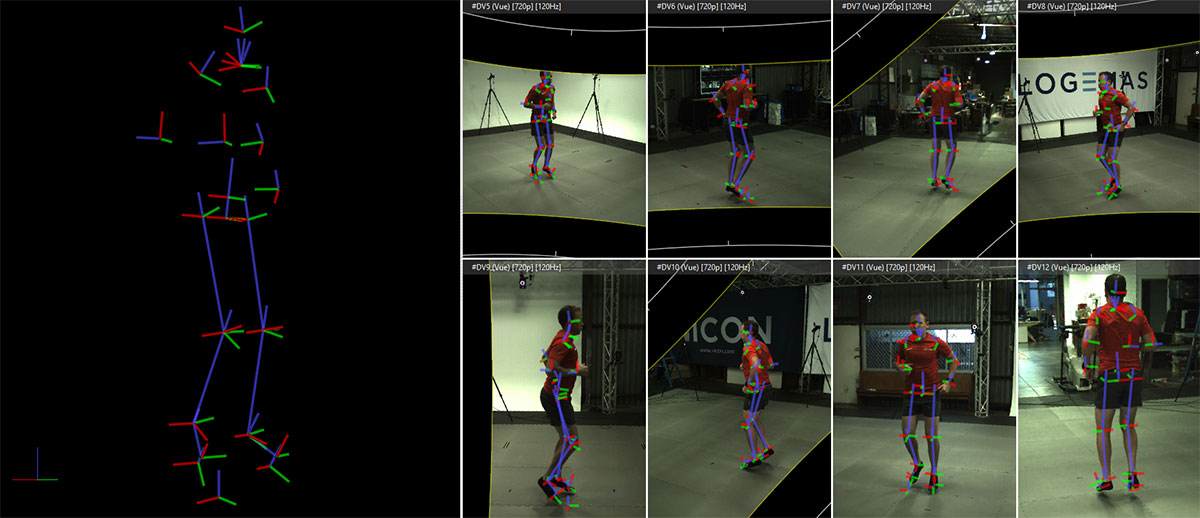
Markerless data relies on multiple synchronised and calibrated videos to be recorded for each trial. Whilst markerless data capture is often touted as being easier than marker-based data capture, there are still a number of technical aspects you need to have under control for a successful capture and to meet markerless processing standards. Read about Alex’s First Impression of markerless mocap here. Vicon Nexus, built from the ground up to streamline complex data captures, has several existing features to assist markerless data capture, and with Theia integration Vicon have added some more features to add on to this.
1. Video Data Trial Naming and Handling
A simple concept but potentially a great timesaver, Nexus auto-names each video trial and manages your trials in its native Eclipse Data Management program. You never have to rename or move a file throughout the whole process.
2. Video Sync Handled
Synchronisation is fully handled by the Vicon software and hardware, not just between video cameras, but across any device integrated with Nexus. Add force plates, EMG, IMUs or anything with an analog output capacity via the Vicon Lock sync box. No sync movements, no flashing LEDS, frame 1 is frame 1 for everything.
3. Lens Calibration with the Flick of a Wrist
The Vicon wand wave calibration, traditionally used to calibrate Vicon optical cameras, provides all the calibration information required by Theia. This means only one wand wave and zero checkerboards are required. Calibration files output by Nexus for each trial captured (.XCP) are fed into Theia, so even if you recalibrate between trials, the updated information will be output alongside the next trial and automatically read by Theia.
4. Common Lab Coordinate System
Ever tried to align data from two differently defined coordinate systems? Not for fun, I bet. If your project involves comparing markerless and marker data, having the two datasets resolved in a common coordinate system is half the battle! Using the same calibration data and coordinate system definition, Nexus brings your marker and markerless data together, even allowing video overlays for unbeatable visualisation
Set Up
Running kinematic and kinetic modelling of markerless data in Nexus requires some setup. You need three programs installed to complete this process:
- Vicon Nexus 2.14 [or latest release]
- Requires an active licence, often handled by your lab manager
- Vicon ProCalc 1.6 [or latest release]
- Freely available if you already use Vicon Nexus
- Theia Markerless [latest build]
- Requires an active licence, separate to any Vicon licence
Contact us at support@logemas.com for further information on Vicon or Theia licences.
Data Collection
This tutorial will not go into the intricacies of markerless data capture, but we will touch on a few recommendations:
- Contrasting, tight fitting clothes produce the best results – the all black attire in the tutorial video is not ideal but was sufficient for this demonstration!
- The video cameras in the tutorial video need their shutter times reduced to minimise motion blur. This may be limited by how much light is available in the capture volume (brighter light = reduced shutter duration).
- One camera in the demonstration video is not calibrated well. There is enough data from the other seven video cameras to allow processing to be performed, however in an ideal world I would fix this camera and recalibrate prior to capturing data.
Build Your Pipeline
Having a single processing pipeline not only helps keep your data processing structured, but will allow you to perform batch processing. A pipeline consists of an ordered list of operations which may have configurable properties.
Here is the order of operations and property settings to configure for the workflow in this walkthrough:
 Pipeline Operation Setup:
- Theia
- Set path to Theia in “Theia executable”
This operation calls the Theia software and supplies the open trial video and calibration file paths. A new folder is created in the active session folder titled ‘Theia’. The videos are copied and organised into subfolders within this Theia folder to match Theia requirements prior to being read in. Two C3Ds are output in this new folder hierarchy containing the Theia modelling outputs in the form of segment translations and rotations – an unfiltered version (pose_0) and a filtered version (pose_filt_0)
- Add Theia Data
This operation copies the segment translation and rotation information from the newly created C3D back to the original trial C3D in the session folder. This step brings together your markerless modelling outputs and any other data you’ve captured with the trial – marker data, device data and so on. This means you don’t have to worry about the pose_0 and pose_filt_0 C3Ds, they can remain untouched in the Theia folder and be called on again if needed, without having to rerun the whole Theia markerless processing operation.
- Run Theia ProCalc Scheme (Kinematics)*
- Variable Scheme set to “CalculateKinematicsfromTheia”
The first ProCalc operation calculates traditional Euler angle decompositions of the joints based on the segment translation and rotation data output by Theia. The kinematic definitions are readily available to view in ProCalc, or if you are adventurous you can set up your own joint angle definitions.
- Run Theia ProCalc Scheme (Kinetics)*
- Show Advanced
- InputScheme set to “CalculateKineticsfromTheia”
- Variable Scheme set to “CalculateKineticsfromTheia”
If you have force plate data and valid foot contact/s, you can also calculate joint moments using this additional ProCalc operation. Again, the kinetic definitions are accessible via ProCalc if you want to check the workings or work on your own.
- Run Theia ProCalc Scheme (PiG Bones)*
- Variable Scheme set to “CalculatePlugiGaitBonesfromTheia”
This operation simply draws the newly defined coordinate systems into the 3D space. These can be overlaid on any of the video views for a great visualisation and quick visual validation
- Save Trial – C3D – VSK
Saves all the newly calculated model outputs to the C3D and VSK.
*If any ProCalcCL Folder properties are empty, the default filepath is “C:\Program Files\Vicon\ProCalc\”
When you first start your processing journey, go through and run these operations one at a time to ensure everything executes as expected. Once you are confident, you can enable all the operations and run a batch process to efficiently process many trials.
Download pipeline from here to import into Nexus: https://drive.google.com/file/d/1OiyD3rNYvvrCrJ4vQi75OoaI8B0-oAlJ/view?usp=share_link
Get more info on Video File Transfer (mentioned at 50s) here:
https://docs.vicon.com/display/Nexus214/Transfer+and+transcode+digital+video+files
Pre-Processing Checklist
- Video cameras successfully calibrated, trials recorded and video files transferred
- Pipeline ready to go (make yourself or download here)
- Body mass entered in Subject Parameters
- Latest version of Theia and Nexus installed
- ProCalc installed (version 1.6 or later for kinetics)
Notes on Markerless Motion Capture
Vicon Nexus Documentation: https://docs.vicon.com/display/Nexus214/Run+Theia+processing+on+video+files
Theia Documentation: https://www.theiamarkerless.ca/docs/