What is CGM2?
If you have recently used Vicon Nexus or undertaken training with Logemas (or another distributor, if you’re reading this from another part of the world), you may have come across CGM2. CGM2 is the abbreviation for clinical gait model (version 2). Clinical gait model version 1 has been around for a long time, is widely published with and is still in use by many laboratories to this day. You may have heard of it by its nickname, Plugin Gait, or the not so flattering abbreviation PiG. The widespread adoption of CGM1/PiG is due to a combination of factors, including being developed and used by prominent gait labs in the 1990s and 2000s, a formative time for 3D gait analysis, and also being easily accessible via its packaging within Vicon’s life science software, Nexus. This meant that a user didn’t need coding/programming expertise to run a biomechanical model, an advantage to this day with students or researchers whose expertise lay elsewhere.
So CGM2 is the progression on CGM1/PiG, but what has changed, and why? If the original was so widely used, can we not stay with it? There are a number of reasons that an update is due, including considerations such as the original marker sets being developed with small and much less powerful camera systems of the time in mind. The CGM2 website does quite a good job of detailing the reasons behind an update, you can find them here in the Strengths and Weaknesses sections – CGM Background.
The CGM2 model continues to grow and be validated. You will see on the website it is referred to as CGM2.i, a term which covers all the variations available. For additional complexity, the website is pycgm2.netlify.app – the py refers to python, the coding language the new version is written in. Rest assured it is all referring to the same thing, CGM2!
CGM2 is available thanks to Dr Fabien LeBoeuf, Professor Richard Baker, Dr Morgan Sangeux, and a number of contributors, who ensure both the biomechanical model, the code and the model implementation into various softwares are tested and validated. If you use CGM2.i in any published research, or wish to acknowledge them in general, be sure to cite their work using the references below.
How Do I Use CGM2?
For most applications I use CGM2.3, a version that removes the need for wands (instead using mid-segment marker clusters), or CGM2.4 (two-segment foot version). You can read the details of the different variations here, be sure to check them out and understand their unique marker sets and strengths before choosing one. It is also important to understand what level of validation that particular version has undergone, however that is a little harder to quantify. The CGM2 website lists some publications, but be sure to do a search for more recent releases. The early iterations are more stable, with new features still being built into later versions, including more advanced modelling such as functional joint definitions.
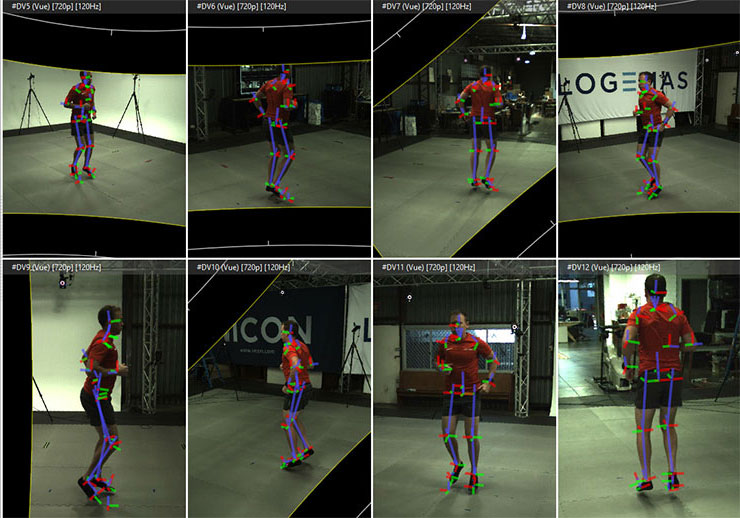
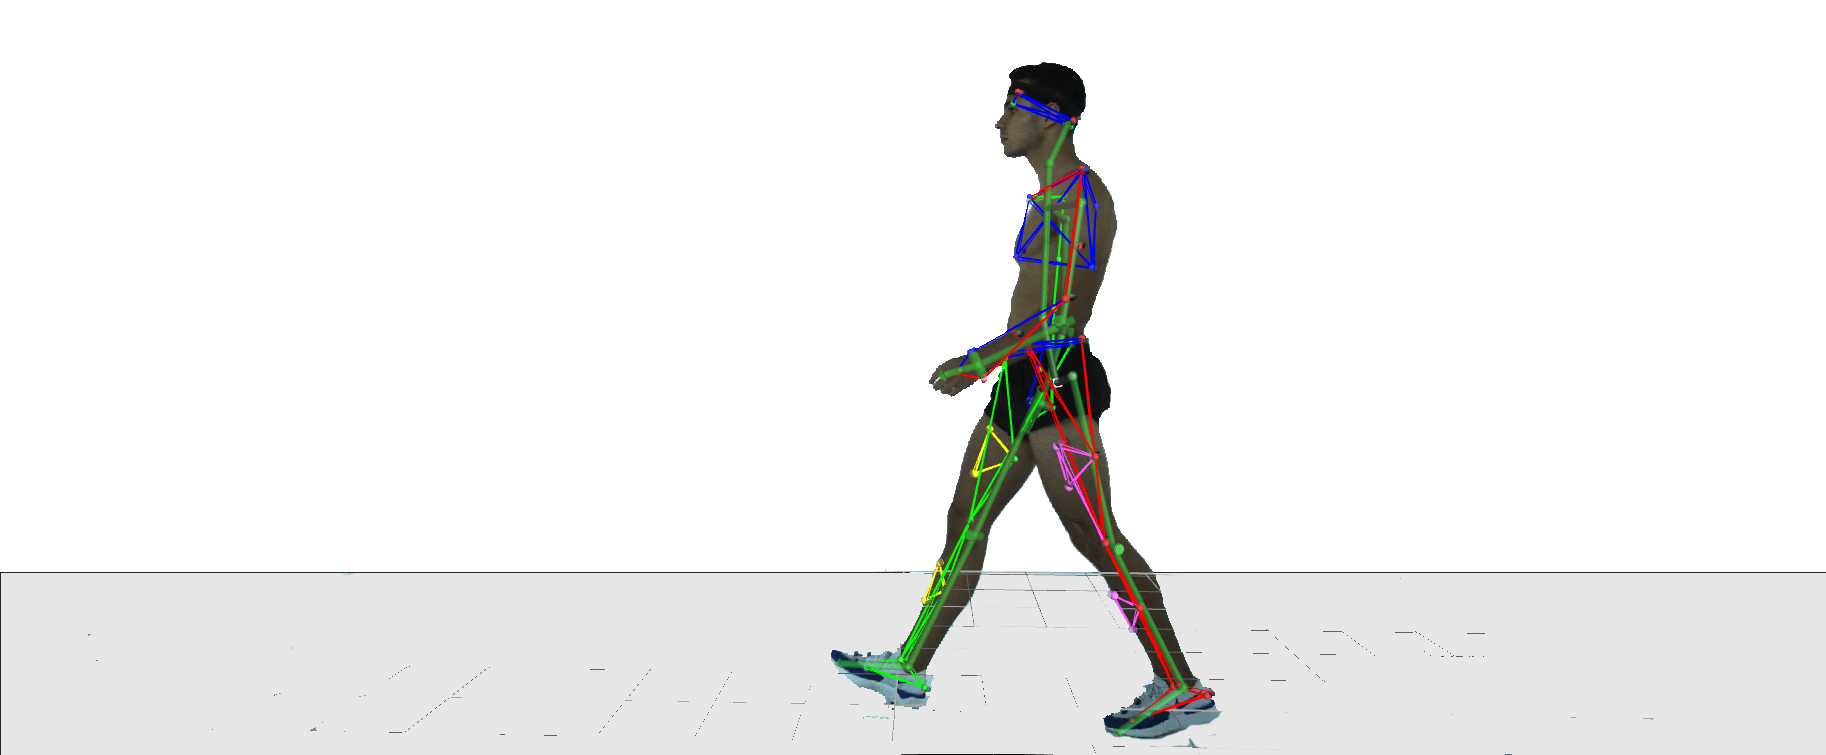
There are a few ways you can implement the CGM2.i model. Before any modelling can take place you need to record your data. That is a separate blog for another time! You can use your own data, or there is sample data attached at the bottom of this blog post. This blog doesn’t go through labelling, so be sure to complete that prior to trying these methods.
Standard Method: Built-In Nexus Operations
You can use the inbuilt Vicon Nexus operations to quickly and easily model CGM data. These are now conveniently grouped in their own subsection:
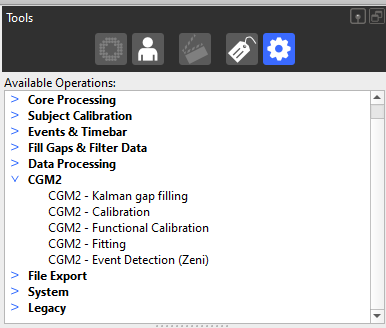
The two you need are CGM2 – Calibration and CGM2 – Fitting (you can read more about the other operations here). But before we get there you need to Create a Subject and Attach a Labelling Skeleton that matches the data you’ve recorded.
Calibrate CGM
CGM2 – Calibration initiates the model, the same as ‘static modelling’ in older terms. Distances, offsets and other calculations are run on a controlled trial – i.e. no movement and in a neutral A-pose. It is still VITAL that every marker be visible for this trial (in an emergency, at least for a single frame within the trial). You need to enter some anthropometric measurements before running the calibration phase.

Once the properties are entered you should save the subject, then you’re ready to perform the calibration operation. Once you’ve entered it into your pipeline window, you can find the properties, some of which need setting:
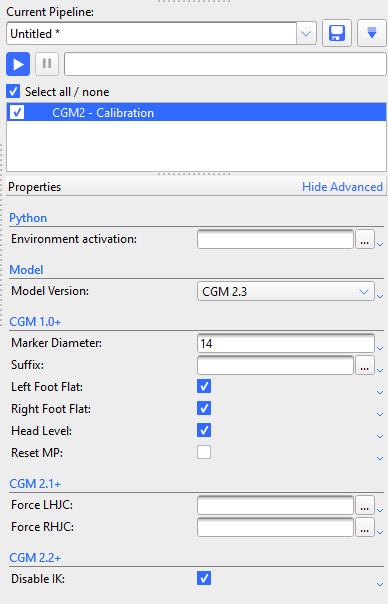
Important Properties:
- Model Version – be sure it matches in calibration and fitting, and the marker set you’ve captured.
- Marker Diameter – 14 is default for most labs, adjust if necessary
- Disable IK – check this box to maintain the traditional ‘direct’ kinematics calculations. Only leave unchecked if you’re confident in the IK procedure.
All other properties can be left as default, see this page for more in-depth details on specific properties in all CGM versions.
CGM2 Fitting
If successful, you will get a green tick and you’re ready to move onto modelling your movement/dynamic trials! Again, set the properties to match your data and what you had during the Calibration procedure:

Important Properties:
- Model Version – be sure it matches in calibration and fitting, and the marker set you’ve captured.
- Marker Diameter – 14 is default for most labs, adjust if necessary
- Disable IK – check this box to maintain the traditional ‘direct’ kinematics calculations. Only leave unchecked if you’re confident in the IK procedure.
All other properties can be left as default, see this page for more in-depth details on specific properties in all CGM versions.
Version Check
If you need to check what release version of CGM2i is installed with Nexus, it prints out a lint in the log each time an operation is run (even an unsuccessful one). It prints as one of the first lines though, and CGM2i outputs a lot into the log, so you may need to scroll up to find it!
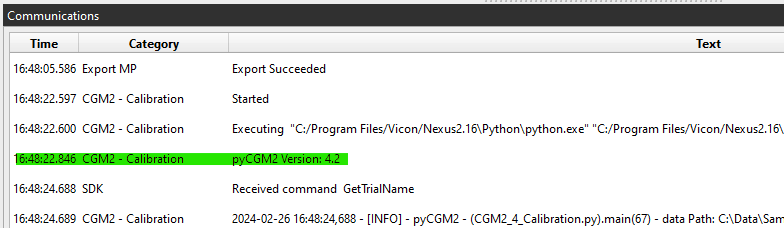
The CGM2i version packaged in Nexus is usually not the most recent available from the website. Any version packaged into Nexus has undergone additional testing by the Vicon team to ensure stability, so it is usually several point releases behind the latest available version but please note there is no additional testing for biomechanical validity.
Advanced Method: Nexus + Supplied Python Scripts
The official CGM2i website has walkthroughs for setting up a python environment and implementing the CGM2i model via the source coding
This method allows you to use the most up to date model version (at the time of print, March 2024, the version available is 4.3).
Super Advanced (you’re on your own): Full-Python Immersion
Import trajectory data into python and model using supplied python scripts. Removes reliance on any other software for handling data. High level of coding/programming expertise required, we aren’t able to help here!
References and Resources
How to cite pyCGM2?
If you use pyCGM2 for a general purpose, please cite as follows:
Leboeuf, F.; Baker, R.; Barré, A.; Reay, J.; Jones, R.; Sangeux, M. (2019) The conventional gait model, an open-source implementation that reproduces the past but prepares for the future. In : Gait & posture, vol. 69, p. 235–241. DOI: 10.1016/j.gaitpost.2019.04.015.
https://www.sciencedirect.com/science/article/abs/pii/S0966636219304333
If you use CGM2.1 or greater, please also cite this paper:
Leboeuf, F.; Reay, J.; Jones, R.; Sangeux, M. (2019) The effect on conventional gait model kinematics and kinetics of hip joint centre equations in adult healthy gait. In : Journal of biomechanics, vol. 87, p. 167–171. DOI: 10.1016/j.jbiomech.2019.02.010.
Another publication from the same group that may be of interest:
- Leboeuf, A. Barre, K. Aminian, M. Sangeux,
On the accuracy of the Conventional gait Model: Distinction between marker misplacement and soft tissue artefact errors, Journal of Biomechanics, Volume 159, 2023.
https://www.sciencedirect.com/science/article/pii/S0021929023003445